

2021 Bronco - Rear Drawer Locker + Folding Table + Console Vault
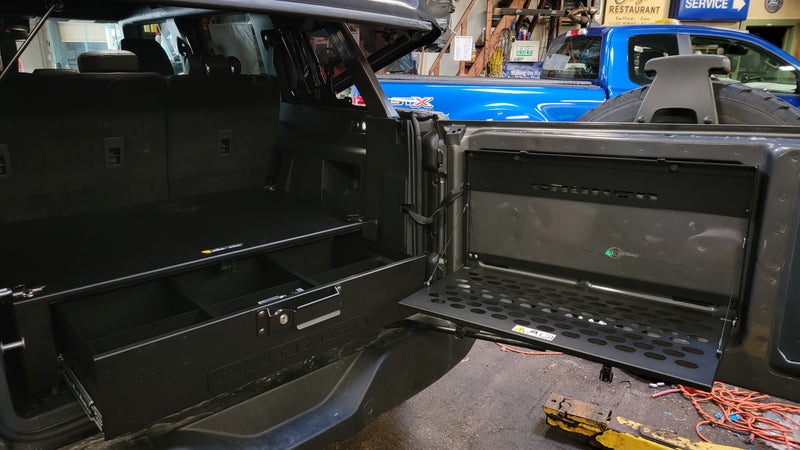
Overall we are pretty pleased with these three accessories we had to install in our demo. This is a very basic overview install, to possibly help guide someone with basic technical and tool knowledge. We will start with the locker. It fits great, and is built well. Note, the hardware is hiding inside and you can't see it until you remove the drawer from the case. We got pretty frustrated by this.
You start by removing the 4 tie down hooks, and replacing the inner bolts with included standoffs. Next step is simply placing the case over the studs. This is our first gripe. It would have been nice to have new bezels or blockoffs for what remains visible of the tie down area. Oh well. From here, you tighten the lock nuts onto the studs from inside. Kind of a tricky area but you can start them by feel. A cordless ratchet makes tightening immensely easy, compared to using a hand tool.


Next up, use the included low profile torx bolts to reinstall the tie downs up on top. Then install the drawer and you're done! It is a good sized, rugged piece of equipment with removable dividers. Sig P365 shown for scale.


Next up is the folding table. Great product, relatively easy install, mediocre execution in our opinion. You start by putting some protector on the sharp painted edges that it mounts to. Easy enough. Our next gripe is the lack of paint behind the trim panel that is removed, not very encouraging if we may say so. You install the main support bar and then loosely bolt the bracket to it, to give you a way to mark the holes you will need to drill. Once marked, you drill them to 7/16 and insert the self expanding nutserts. Our only major issue with all this is that one nutsert was defective and not threaded, so we left it out and will finish later. The lower right seemed to be the place to leave one out if required.


Once the inserts are in, you reinstall the frame. Not, you want to roll the lower brace in, prior to bolting it up. Follow the pictures and do a rubber washer behind, with a bolt and lock washer in front. Tighten up all the hardware as shown, and boom. Table is ready. Once it is installed, its quite rugged.


Finally, we have the center console safe. It is also quite rugged, and very quick and easy to install. The inner workings are hinged to make it easy. Set it down in, following the front sticker (which leaves the key slot open for those dead fob battery starts). Self tapping screws are included, to hold the lower section into the vehicle. The upper is set in, and 4 nuts are tightened onto preinstalled studs from inside. It is not a tank, but you would have to totally destroy the center console to get it out and open. It will definitely keep honest folks honest, and will fit most EDC sized handguns or valuables.


