The Redline - A Juggernaut Blog
2021 Bronco Rough Country Spare Tire Relocation Bracket
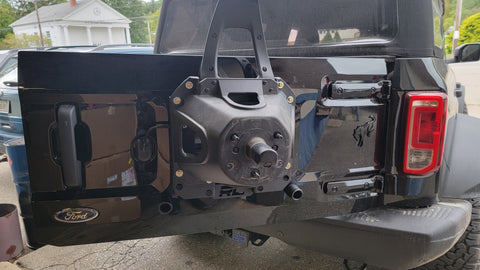
We decided to try out the Rough Country spare relocation bracket as it is under $100 and made in the USA! Overall pleased with it especially for the money. Here is a quick install write up.
First remove your spare and move around to the inside of the gate. You will see a trim panel on the right edge. Remove this with a trim tool, from the inside edge. The outside edge has sliding retainers so you don't want to pry straight out on the outside. Inside, you will see the pass through harness. Undo the two connections, and squeeze the retainers to allow the wiring to go fully outside the vehicle.


Unbolt the 8 13mm head bolts holding the stock bracket in place and set aside for now.


I didn't like how the bracket had no padding on the paint so I added some moisture tape to the contact points. Not the prettiest way, but quick and easy and I needed to get it back together.

Install the bracket using the OEM bolts you removed. Now replace the factory bracket, paying attention to the wires. Undo the outermost clip to give the harness some slack, and make sure it is passing through the RC notch, not the factory notch, where they meet.


Bolt the bracket on using the provided hardware, using a 13mm or 1/2 wrench in back to hold the nuts. Pass the wires thru and reconnect connectors and trim panel as they were removed!


2021+ Bronco Baja Designs Fog Pocket Kit - Modular Bumper
We just got the first of many Baja Designs products in for our 21 Bronco. This is the 447762UP which consists of a pair of S2 Sports in driving/combo, a pair of S2 Sports in Spot, and a set of Squadron Amber SAE in wide cornering. These guys are super easy to install and don't require any cutting or drilling.
The kit comes with instructions, so as usual, we are focusing more on some helpful tips to show Bronco specific installation. You can use their guide as a baseline for mounting and setting up the lights themselves.
As always, everything from BD is top of the line with perfect fitment. We started by running our main harnesses down from the upfitter wiring area over the fender rail, and down the inner wheel liner. There is plenty of space and nothing tricky about it. We proceeded with running the large splitters to the desired locations. It is set up to run the S2s on one harness and the Squadrons on another. So you will tie together the S2s on each side, before going into the large splitter connecting side to side. Then, obviously, the squadrons connect directly to the larger splitter. Layout shown in picture below.

We tied our harness up to the inner most light bracket on the inside, as there is room for a cable tie behind where the light mounts. We then ran it across the bash plate tying the harness to the mounting brackets of the plate.

With the harness secure, you can pull any extra up into the engine bay. We looped it back over on itself and tied it securely to the inner fender, out of sight.

Finally, the connections. They include a relatively high end "scotchlock" type connector to attach to the upfitter wiring. We chose to use switches 5 and 6, as a 5A relay is plenty for the lights draw. We do not generally like scotchlock style connectors, but the ones BD uses seem well made so we decided to try them and see how it holds up. This permits no electrical tools to be needed during install, just a simple plier squeeze. Behind the upfitter location, there are several grounds. Any of which can be used for the included eyelets! And boom, you're done! Aim them and you're on your way. Hit up Juggernaut Performance for your Baja Designs needs!


2021+ Bronco Flare Mockups
We've got a couple sets of flares kicking around waiting for Broncos to come in, so we figured we'd do a real quick install on the driver's front to compare! Most know how easy it is to remove and install at this point so we will get right to the photos! This is on stock Outer Banks 32s. Obviously you'd want some wheels and tires to fill the gap. We are chomping at the bit for ours to come so this is just a holdover.
First up is the stock Outer Banks painted flares (same as non painted, just...painted)

Next is the steel flares made by Bushwacker. Note these are great quality, and come with weather strip. They also bolt on, instead of quick release. Little more rugged and secure than the plastic ones. The included hardware is very nice as well. Big soft washers, nylock nuts, etc!


Finally we have Sasquatch flares!


